
A.J. Publishing Using Scribus
This tutorial describes how to create amateur journals using the free open-source desktop publishing application Scribus. Scribus is a full-featured program, which means it can be complicated and intimidating. But by using a provided template file to jump-start your publishing, and learning a core subset of commands, you can learn the basics to produce a journal with only a little effort. (You can explore additional Scribus features once you are comfortable with the basics.)
Click on any of the following links to go to a part of the tutorial:
- Exercise 1: Download and Install Programs and Files
- Notation, Nomenclature, & Notes
- Exercise 2: Getting to Know Scribus
- Exercise 3: Adding a Title Page
- Exercise 4: Loading Text From an .odt File
- Exercise 5: Prepare for Second Article
- Exercise 6: Adding a Second Article
- Exercise 7: Adding Decorations and Fine-Tuning
- Exercise 8: Creating Text With LibreOffice
- Exercise 9: Completing The Journal
- Exercise 10: Preparing a PDF File
- Exercise 11: Exploring Properties
- Exercise 12: Changing Fonts
- Exercise 13: Adding Headers
- Exercise 14: Setting Templates
- Frequently Asked Questions
This tutorial is brought to you by the American Amateur Press Association. If you are looking for an outlet for your publishing efforts, consider joining AAPA. You'll find a friendly group of folks who enjoy exchanging printed journals, zines, and other publications.
You can download this Scribus tutorial in PDF format, which is more printer-friendly than the Web version.
Scribus and the other tools described here run on a wide variety of operating systems. This tutorial was prepared using a personal computer running Windows 10.
Exercise 1: Download and Install Programs and Files
To get started, download and install several applications and files:
- Scribus is the desktop publishing application. I used version 1.4.6 to create this tutorial; other versions may behave somewhat differently.
- LibreOffice is a suite of programs to create documents. You will be using the Writer application to create text files in the OpenDocument Text (.odt) format, which can then be loaded into Scribus. (Microsoft Word can create .odt files, but they are incompatible with Scribus.) I used LibreOffice version 5.2 to create this tutorial.
- Ghostscript is used by Scribus for some functions, such as Print Preview. Since you aren't using Ghostscript for commercial purposes, you can download the "GNU Affero General Public License" version.
- If it is not already installed on your system, get Adobe Acrobat Reader. It allows you to read Portable Document Format (PDF) files.
- A group of templates, articles, and images are available from the AAPA website in a single compressed folder, AJPubs.zip, to jump-start your use of Scribus. Click on that link and save the compressed folder on your computer. After it is downloaded,
- Open the file's parent folder (usually Downloads)
- Right-click on AJPubs.zip
- Select Extract All... from the pop-up menu
- For the destination, choose a convenient location such as Desktop or Documents.
If you are running Windows, you need to tell the system to open Scribus Document files (.sla extension) with Scribus. To do this
- Open the newly-uncompressed AJ Pubs folder
- Right click on AJTemplate.sla
- Select Properties and then its General tab
- Set Opens with: to Scribus.
You will also want to tell the system to open OpenDocument Text files (.odt extension) with LibreOffice Writer. To do this,
- Right click on AJTemplate.odt
- Select Properties and its General tab
- Set Opens with: to LibreOffice Writer
Once you have installed the programs and AJ Pubs folder, you are ready to start experimenting with Scribus. Since the exercises in this tutorial will modify the Scribus and ODT template files, you should make copies so the unmodified templates are available to start future projects. Of course, you can always re-download the entire compressed folder to get fresh copies.
Notation, Nomenclature, & Notes
The remaining parts of this tutorial describe a variety of actions you will take on your computer. The exercises use notation conventions to save a bit of space. For example, if you are directed to access
you are being asked to click on the "File" pull-down menu near the top of the Scribus main window, then select the "Document Setup..." item in that menu.
Bold lettering is used when there is something you type with the keyboard or select with the mouse. For example,
- F3 is the third function key
- ctrl+T indicates holding down the "ctrl" key while simultaneously pressing the "T" key
- ctrl+shift+- indicates holding down the "ctrl" and "shift" keys while simultaneously pressing the "-" key
- enter is the "enter" key
- tab is the "tab" key
Click is the same as left-click; right-clicks are always explicitly noted.
If you are asked to "drag" something on a screen, click on it and hold the button down while you move the mouse. Release the button to complete the drag operation.
If you want to undo just about any action, type ctrl+Z or select Edit > Undo.
Once you successfully complete an operation, type ctrl+S or select File > Save to save your work. If a group of changes turn out to be incorrect, you can restore the last saved version of the file with File > Revert to Saved.
Scribus will automatically save a copy of your file every ten minutes. (This can be configured from File > Document Setup for the current file or File > Preferences > Document for future documents.) The autosave file name is the same as the original with ".autosave" appended to the end. If your original file becomes unusable, you can delete it, remove the .autosave extension from the copy, and then open it.
Every now and again, the Scribus main window gets out of synch with the changes you make. If you're sure you made a change but it doesn’t show up, or the display simply looks odd, it’s time to save your work, close the program, then reopen the file...and most of the time everything will look fine. Since it’s free software, I guess we can expect a few minor glitches like that.
Many of the illustrations in this tutorial will expand to full size in a new browser tab if you click on them.
Exercise 2: Getting to Know Scribus
Double-click on AJTemplate.sla to open it with Scribus.
The Scribus template document has 14 pages. The first page contains a single text frame; you will use this as a title page for an amateur journal. Pages 2 through 12 each have a text frame, plus a small footer frame that contains a centered page number. The text frames on these pages are chained, so when the frame on a page is filled with text it will flow onto the following page. Pages 13 and 14 contain lines and boxes that can conveniently be copied and pasted to other pages. These last two pages are not intended to be printed.
2.1: Viewing Options
Click on the View menu at the top of the main Scribus window. You can experiment with various settings and determine what items you like to see. You probably want to show at least Frames and Guides. You may like a Ruler at the top and along the left side. Show Text Chain will draw arrows between the text frames from page to page, and some exercises refer to them.
2.2: Margins
AJTemplate.sla is set to print on letter-sized paper folded in half; each page is 5-1/2 by 8-1/2 inches in size, with 1/2 inch inside (gutter) margins and 1 inch outside margins, leaving a text column 4 inches wide. The top margin is about 3/4 of an inch, while the bottom is a little over 1-1/2 inches. (These dimensions can be changed by accessing File > Document Setup..., but please hold any modifications until after you have completed this tutorial.)
2.3: Bottom-Left Controls
At the bottom-left corner of the Scribus window is a control that determines the unit of measure displayed by the program. The initial setting is pt for points (1 point = 1/72 of an inch). I find this a comfortable unit when nudging graphic elements around on the page -- much more convenient than entering a decimal fraction of an inch, for example. Other options are millimeters, inches, picas, centimeters, and cicero.
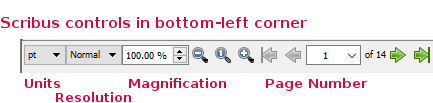
Next to the unit of measure is a control for resolution when displaying graphics; Normal is a good choice because it typically matches the resolution of the screen.
The next set of controls change the magnification on the screen. 100% is fine for routine work, although you may wish to reduce magnification to look at multiple pages at once, or increase it when doing fine placement of graphic elements. You might find a different magnification fits your computer's screen better. There are three magnifying glass icons used to change magnification: decrease, 100%, and increase.
The next group controls the page number you are viewing. Clicking on the right arrow moves to the next page, left arrow moves to the previous page, etc. You can also type the number of the page you want to view.
2.4: Styles
Display the list of defined styles by either
- selecting Edit > Styles or
- typing F3.
The most-used paragraph styles are grouped under Default Paragraph Style: 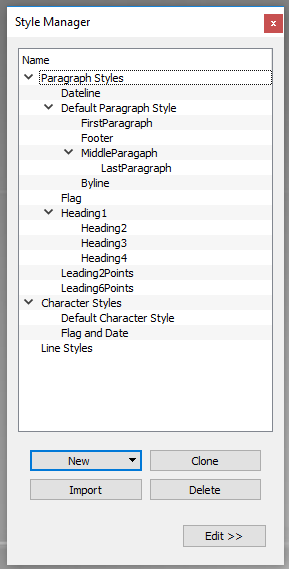 when using FirstParagraph, the initial line is flush left and starts with a drop cap; in MiddleParagraph, the first line is indented; LastParagraph is similar to MiddleParagraph, but allows for a special "end of article" symbol that is flush right on the final line; Byline is centered and has extra space below it.
The four Heading styles use centered bold text of various sizes (1 is largest, 4 is smallest).
The Leading styles are used to insert a small amount of blank space between paragraphs.
The remaining paragraph styles have very specific purposes:
- Dateline: used to format the date and issue number.
- Footer: formats the page number at the bottom of each page after the first.
- Flag: used for the journal's name.
There are two Character Styles. Default Character Style sets the font family used in the various text and header paragraph styles. It is set to Times New Roman in order to be compatible with a large number of systems. Eventually, you may wish to use a different text font available on your computer. As you will learn in Exercise 12, changing it in this one style will change it in all of those other paragraph styles. The other character style, Flag and Date controls the font used in the Flag and Dateline paragraph styles. For compatibility with the greatest number of systems, it is set to Arial.
Eventually you can modify the styles to your liking, but for now leave their default settings alone. Close the Style Manager window by pressing the X in the top-right corner.
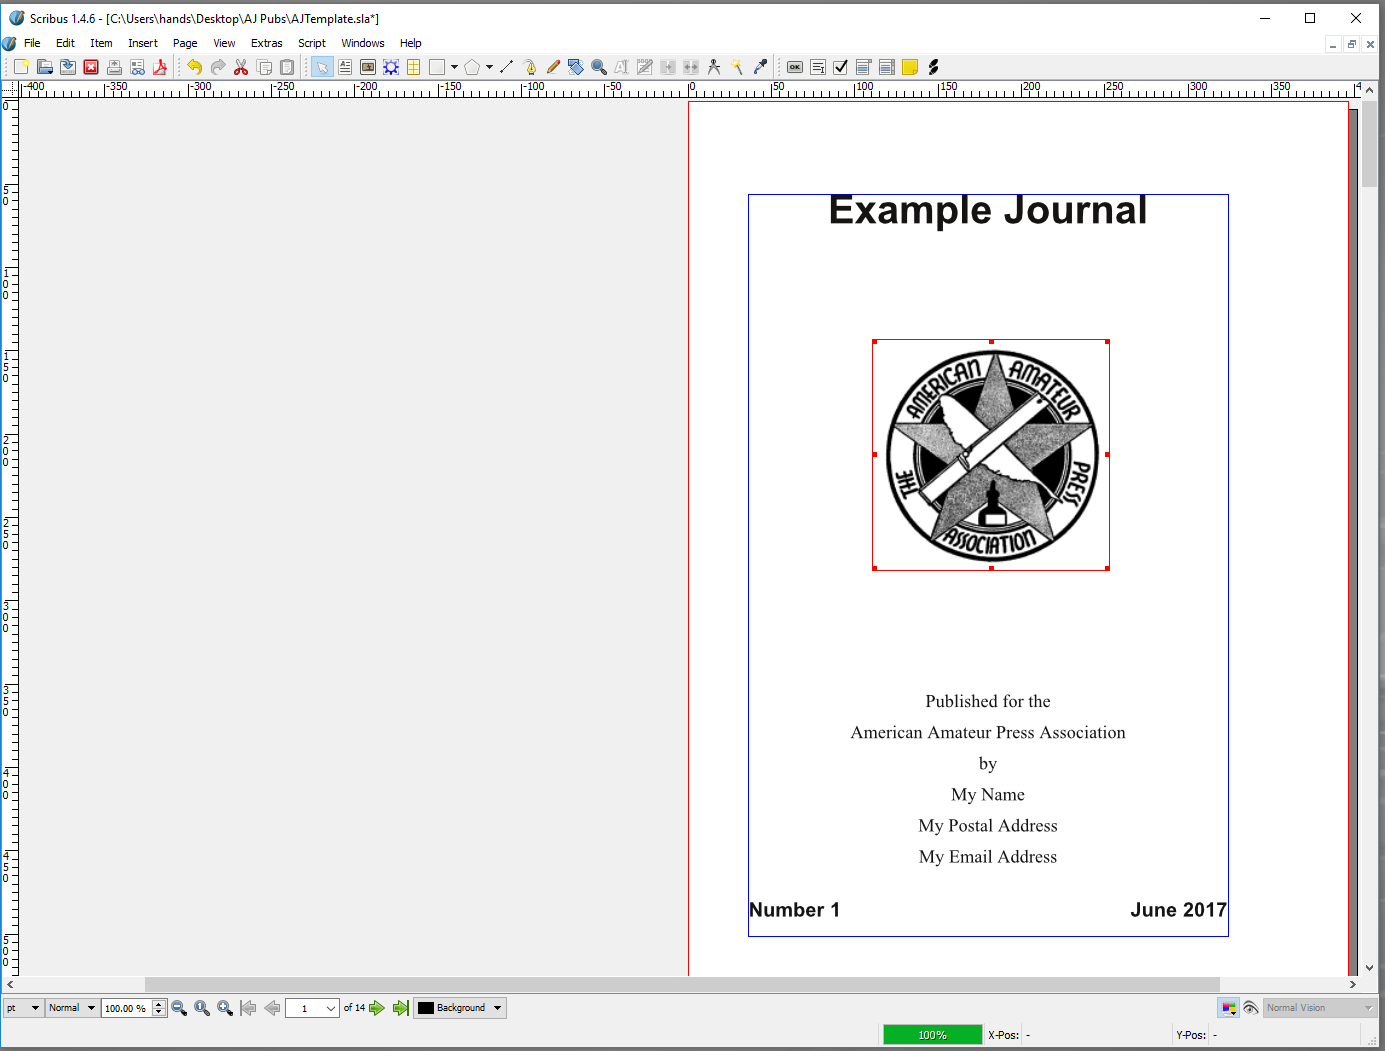
Exercise 3: Adding a Title Page
In this exercise, you will type a title, issue number, and month for the amateur journal. You will also add the AAPA logo. To get started, be sure you are on page 1 of the template file.
When you click in the center of page 1, a red rectangle will highlight the text frame. Open the text editing window by either
- typing ctrl+T or
- right-clicking in the text frame and selecting Edit Text... from the pop-up menu.
Your cursor will be at the top of the right-hand column in the Story Editor window; this is where you will enter text. The first line is the title of the journal; call it "Example Journal". After typing those characters and pressing enter (to end the first paragraph), the left-hand column will display the style of the paragraph (default is No Style). Click in that entry and select Flag from the pop-up menu.
Press enter three more times, then type
- "Published for the", enter
- "American Amateur Press Association", enter
- "by", enter
- "My Name", enter
- "My Postal Address", enter
- "My Email Address", enter
Change the paragraph style of each of these lines to Byline.
Press enter two more times, then type
"Number 1"tab"June 2017"
As you did with the first line, click on the final line's paragraph style in the left column, but this time select Dateline. (You can leave the intermediate blank lines as No Style.)
There are several ways to save the text into the frame on page 1:
- Type ctrl+U (update only) or ctrl+W (update and exit),
- Click on the green check-mark icon (4th icon from left), or
- Inside the Story Editor window, select File > Update Text Frame and Exit
After updating, the text you just typed should appear on page 1 as displayed in the main Scribus window. Click your cursor inside the page 1 text frame above the Published for the line, and then press enter several (maybe 20) times, until the bottom line disappears. Notice that the text frame now has a red X in a box near the bottom-right corner; this is the indication that the text has overflowed from the frame. Press backspace once to remove one of the blank lines; the dateline will reappear and that X will disappear. (If the dateline doesn't reappear, press backspace until it does.)
Next, add the AAPA emblem to the title page. Add an image frame by selecting Insert > Insert Image Frame. Your cursor should change from an arrow to a "+" with a rectangle next to it. Move the cursor to the space between the title and the Published for the lines, click and hold the left button down where you want the upper left corner, drag the cursor to where you want the lower right corner, and release the left button. You should see a red rectangle with a black X through it. When you move the cursor over the image frame, the cursor turns into a hand. You can use your mouse to adjust the frame's position.
To load the AAPA logo image into the frame, while the frame is selected either
- Type ctrl+I, or
- Right-click inside the image frame and select Get Image... from the pop-up menu.
When the Open dialog appears, be sure the Look in folder at the top of the dialog points to the AJ Pubs folder. Select the file AAPAlogo.tif and press the OK button (near bottom right of the dialog window).
The logo should appear inside the image frame, but it is likely that your frame is too small to hold the entire logo. To make it fit inside your frame, right-click inside the image frame and select Adjust Image to Frame from the pop-up menu.
To change the size of the frame, you can drag the "handles" located on the frame's corners or the mid-points of the sides The image should automatically resize to match your adjustment.
Remember, if you want to undo an adjustment (or just about any action), type ctrl+Z or select Edit > Undo.
To ensure the emblem is exactly centered between the left and right page margins,
- Select Windows > Align and Distribute; the Align and Distribute dialog window will open.
- Select the emblem's image frame by clicking on it in the main window.
- In the dialog window, on the Align tab, set the Relative to control to Margins in the pull-down menu.
- The Align Sides By: control should be set to Moving (Preserve Size) by default.
- Click the top-middle icon; hovering over it shows the title Center on vertical axis.
- You can close the dialog window by clicking the X in the upper-right corner.
Congratulations! Your title page is complete and should look something like this:
(Note: you can click on this and later screenshots to open them in a new browser tab)
Save your work by typing ctrl+S.
Exercise 4: Loading Text From an .odt File
Scribus is a publishing program, with limited capability to enter text. For anything beyond the simplest text, you will create an OpenDocument Text file using LibreOffice Writer, and then load that text file into a Scribus text frame. For this exercise, we will use the file Round.odt, which contains "At Least They Are Round" by Sheldon C. Wesson (first published in Al Fick's Heritage for April 1956, and taken from the "Examples" section of the AAPA website).
Load the text into the empty text frame chain that begins on the second page. Use the control at the bottom of the Scribus main window to navigate to page 2, then click inside the page 2 text frame to select it (it will turn red). Open the file selection dialog window by either
- typing ctrl+I or
- right-clicking in the text frame and then selecting Get Text... on the pop-up menu.
Be sure the Look in folder at the top of the dialog points to the AJ Pubs folder. Find the Round.odt file, click on it, and click on the OK button at bottom of the dialog. A smaller window will pop up with four selection boxes; check only the three top boxes, then press the OK button. You should soon see Sheldon Wesson’s article “At Least They Are Round” appear in the text frames on pages 2, 3, and 4.
Looking in the Style Manager window (press F3 if you closed it earlier), you will see some new paragraph styles after reading the ODT file: Round_Byline, Round_FirstParagraph, Round_Heading2, and Round_MiddleParagraph. Scribus took the name of the ODT file and added it to the front of each paragraph style that it imported.
There are slight differences between the newly imported styles and the original Scribus paragraph styles, so you will replace the LibreOffice ones with the equivalent Scribus styles.
Select all four Round_ paragraph styles in the Style Manager by clicking on the top one, then holding shift while clicking on the bottom one. Next press the Delete button near the bottom of the Style Manager window. A Delete Styles window should pop up -- but notice that only one of the paragraph styles is listed! (I believe this is a bug, but not a serious one.) When you remove a paragraph style, you have the option to replace it with another. So, Round_MiddleParagraph should be replaced with MiddleParagraph; make the selection on the menu in the Replace with column, then press the OK button at the bottom of the Delete Styles window. The style you replaced should disappear from the list on the left side of the style manager, leaving three Round_ styles in the Style Manager list. Select all three (as before) and press the Delete button. This time all three should appear in the Delete Styles window. Make the three appropriate Replace with selections and press the OK button. When you are all done making the changes, press the << Done button in the bottom-right area of the Style Manager. The formatted text in the main Scribus window will change slightly, mainly due to differences in spacing between lines.
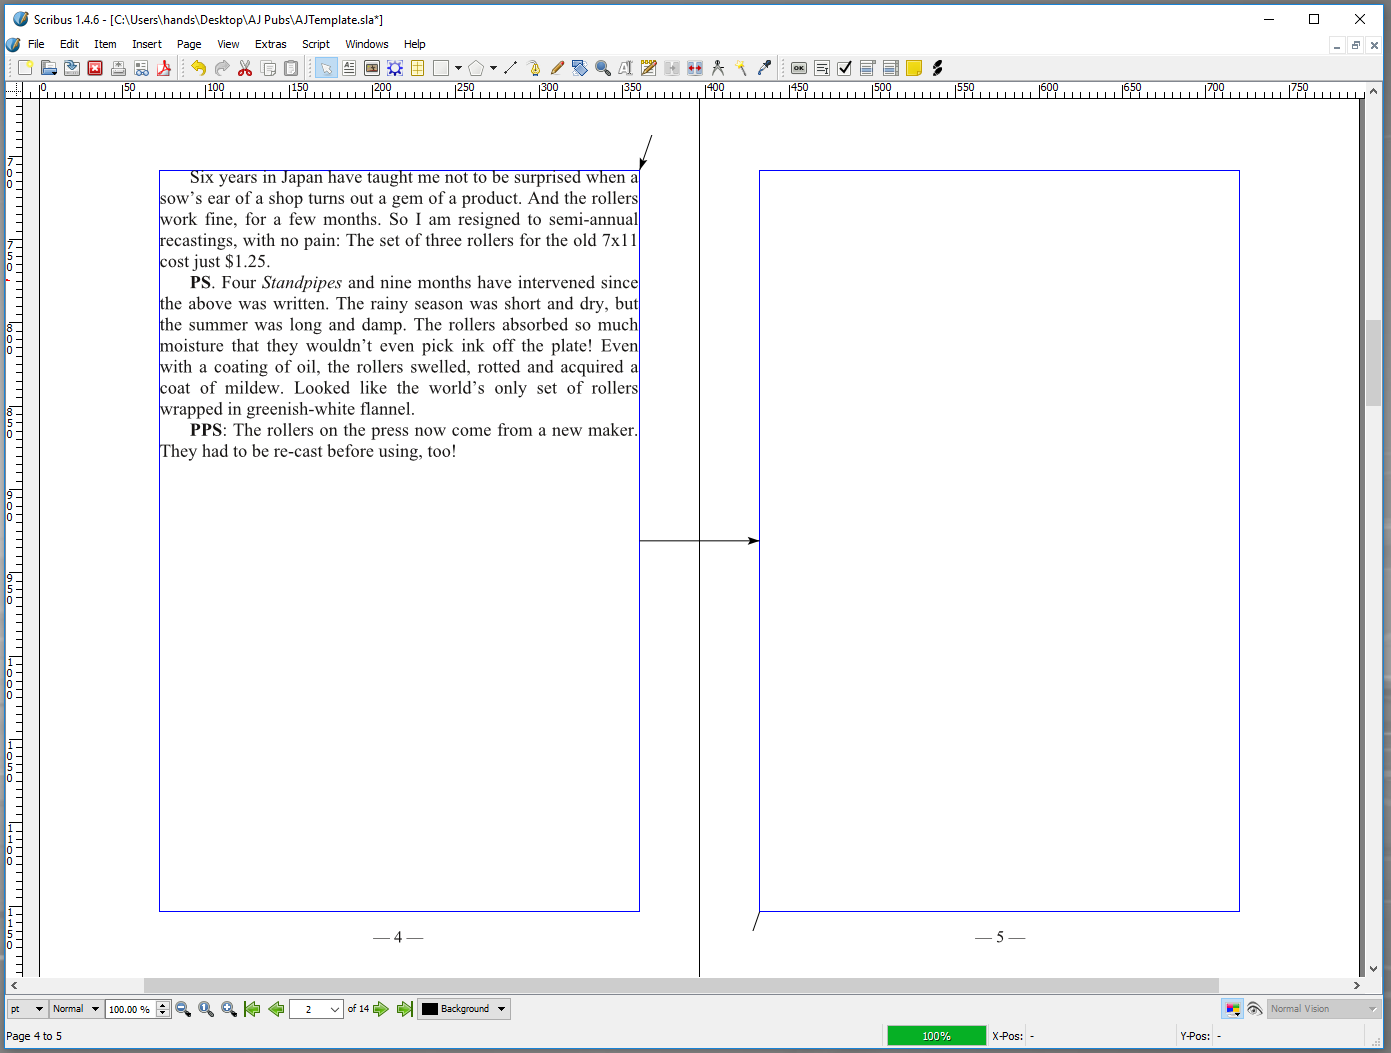
Pages 4 and 5 should look like this:
Save your work by typing ctrl+S.
Exercise 5: Prepare for Second Article
Conclude the first article's text chain on page 4 by unlinking it from page 5. You could start a new article on the top of page 5, but that would leave a lot of unused space on the bottom of page 4. Instead, you will shorten the text frame of page 4, add a new text frame on the bottom of that page, and link the new frame to page 5.
To disconnect the text chain between pages 4 and 5, select the frame on page 4 by clicking in it (turning its outline red). Next invoke Item > Unlink Text Frames, then click in the text frame on page 5. The text chain arrow between pages 4 and 5 should disappear.
To shorten the frame on page 4, select it (making its outline red), then drag the handle in the center of the bottom line up until it is close to the last line of text.
To add a new text frame on the bottom of page 4, copy an empty frame from another even-numbered (left side) page. Go to page 6 and select its text frame by clicking in it. Copy that frame by typing ctrl+C. Return to page 4 (be sure "4" appears in the page number control at the bottom of the Scribus window) and paste the empty frame with ctrl+V.
The new frame on page 4 is full-sized, covering the shorter one at the top. Since the new frame is currently empty that is not a problem, but as soon as you add text it will overwrite the end of the first article. Shorten this new frame by dragging the handle at the top-center down until it is below the frame on the top of the page. Leave about 1/2 inch of blank space between the two frames.
Finally, link this new frame on the bottom of page 4 to the frame on page 5 by selecting Item > Link Text Frames, then clicking in the text frame on page 5. A new text chain arrow should appear between pages 4 and 5.
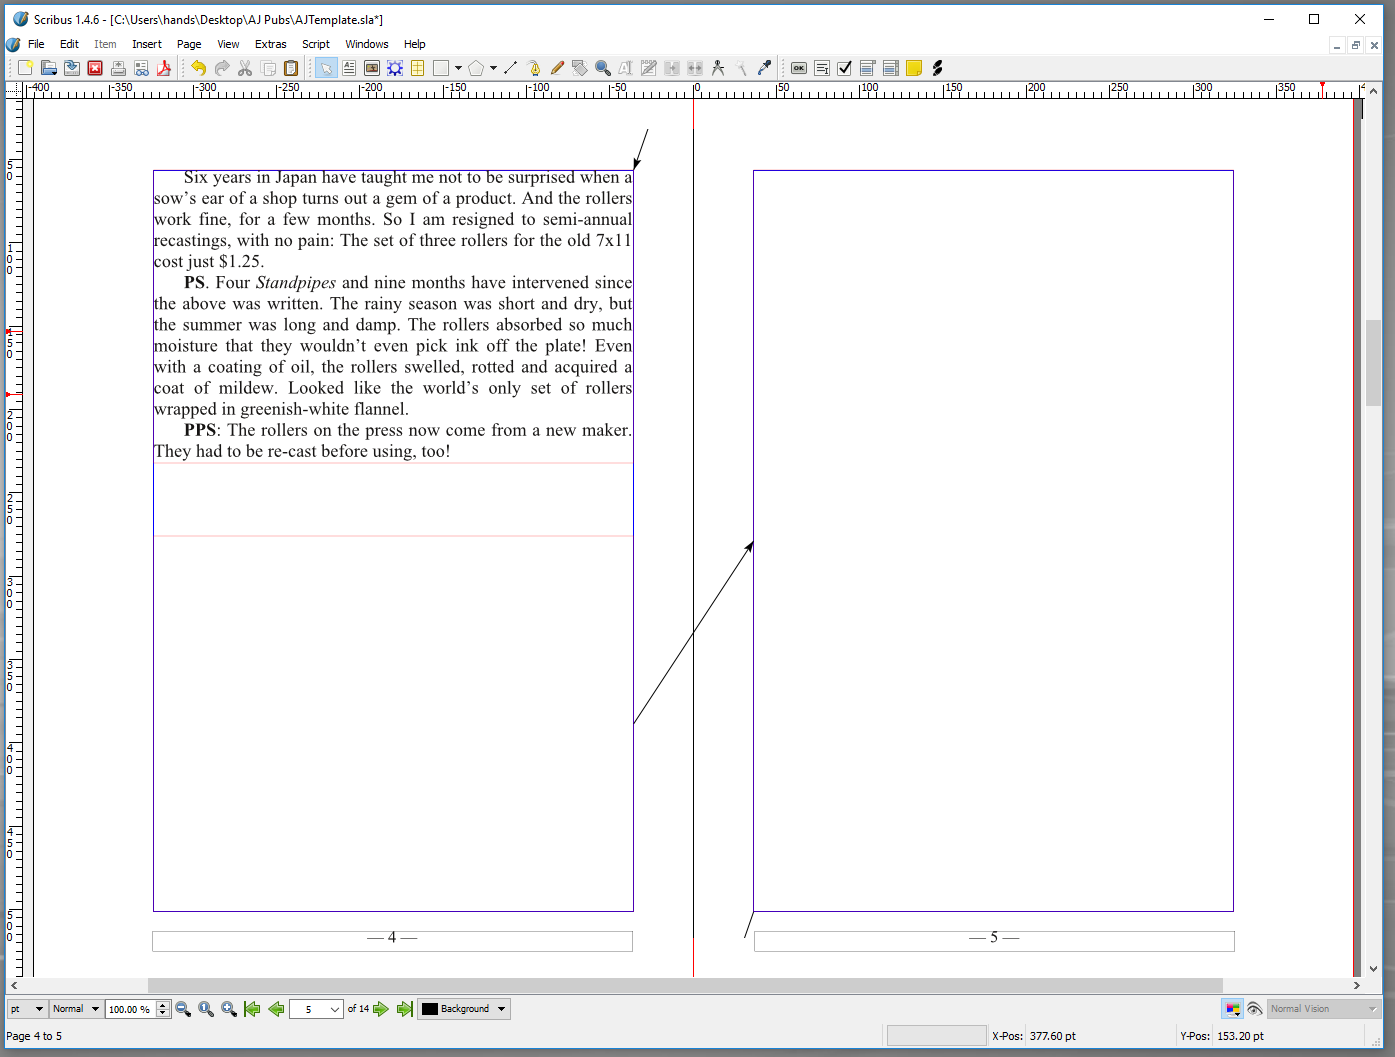
Pages 4 and 5 should now look like this:
Save your work by typing ctrl+S.
Exercise 6: Adding a Second Article
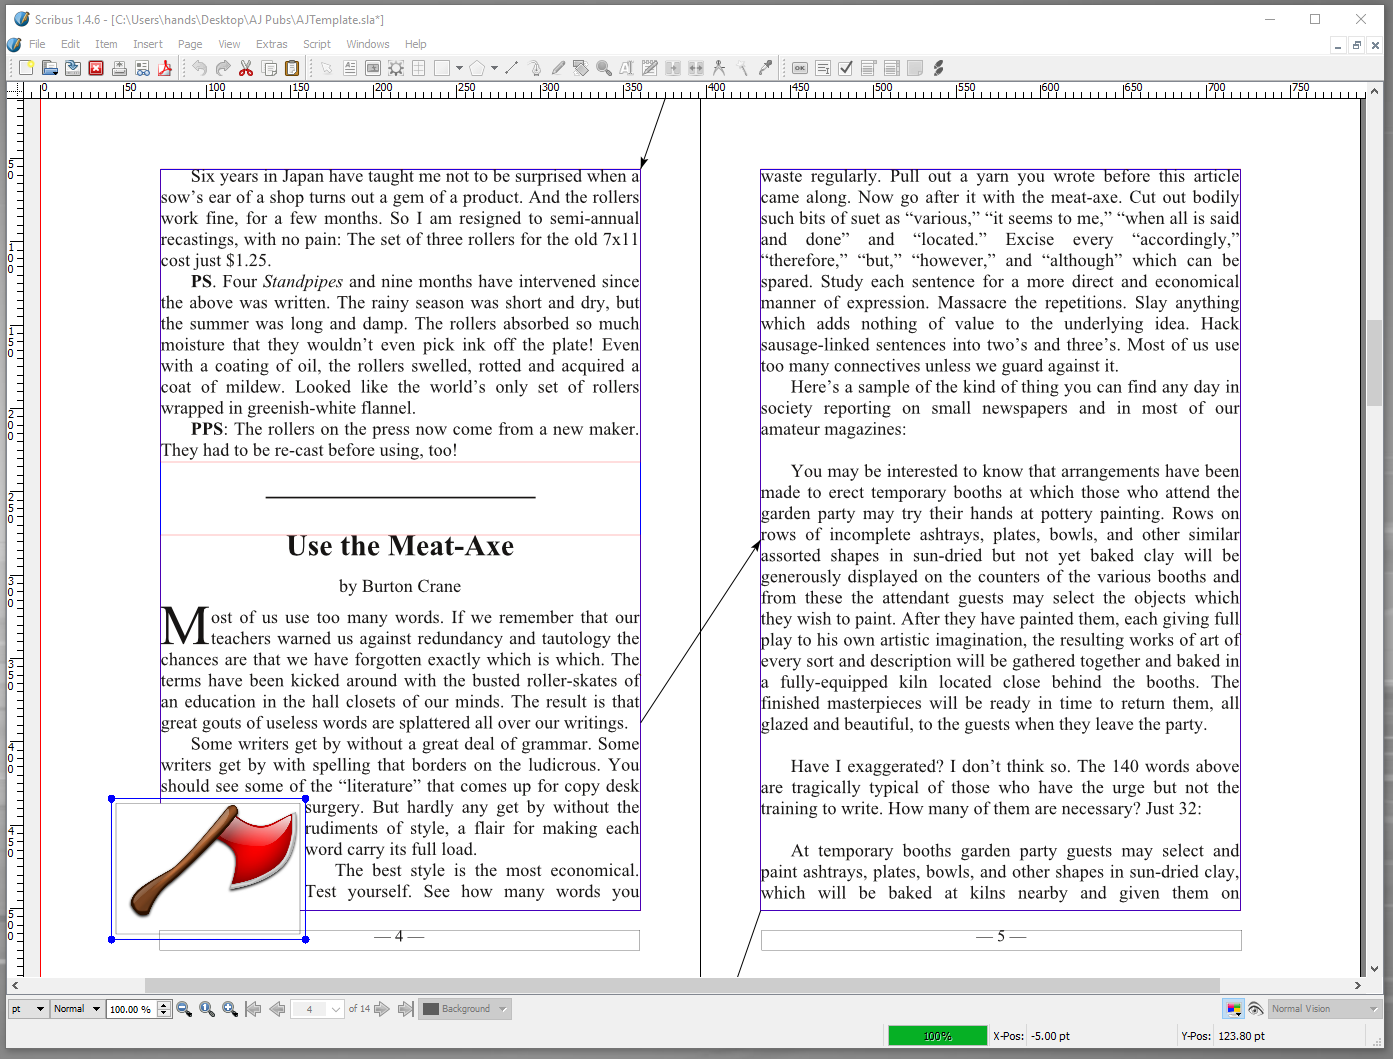
This exercise is nearly the same as Exercise 4, except you will be loading MeatAxe.odt into the chain of text frames beginning at the bottom page 4 and continuing to page 12.
Click inside the text frame on page 5 to select it (it will turn red). Open the file selection dialog window by typing ctrl+I, select MeatAxe.odt, and click on the OK button. As before, in the OpenDocument Importer window ensure the top three options are selected and then press the OK button. Burton Crane's "Use the Meat-Axe" should appear in the text box on the bottom of page 4 and chain on to pages 5 through 8. (It was first published in Ralph Babcock's The Scarlet Cockerel in the 1940s.)
Back in the Style Manager window (press F3 if you closed it), you will see four new paragraph styles that begin with MeatAxe_. Delete and replace them as you did in Exercise 4.
| Style imported from file | Replace with Scribus style |
| MeatAxe_Byline | Byline |
| MeatAxe_FirstParagraph | FirstParagraph |
| MeatAxe_Heading2 | Heading2 |
| MeatAxe_MiddleParagraph | MiddleParagraph |
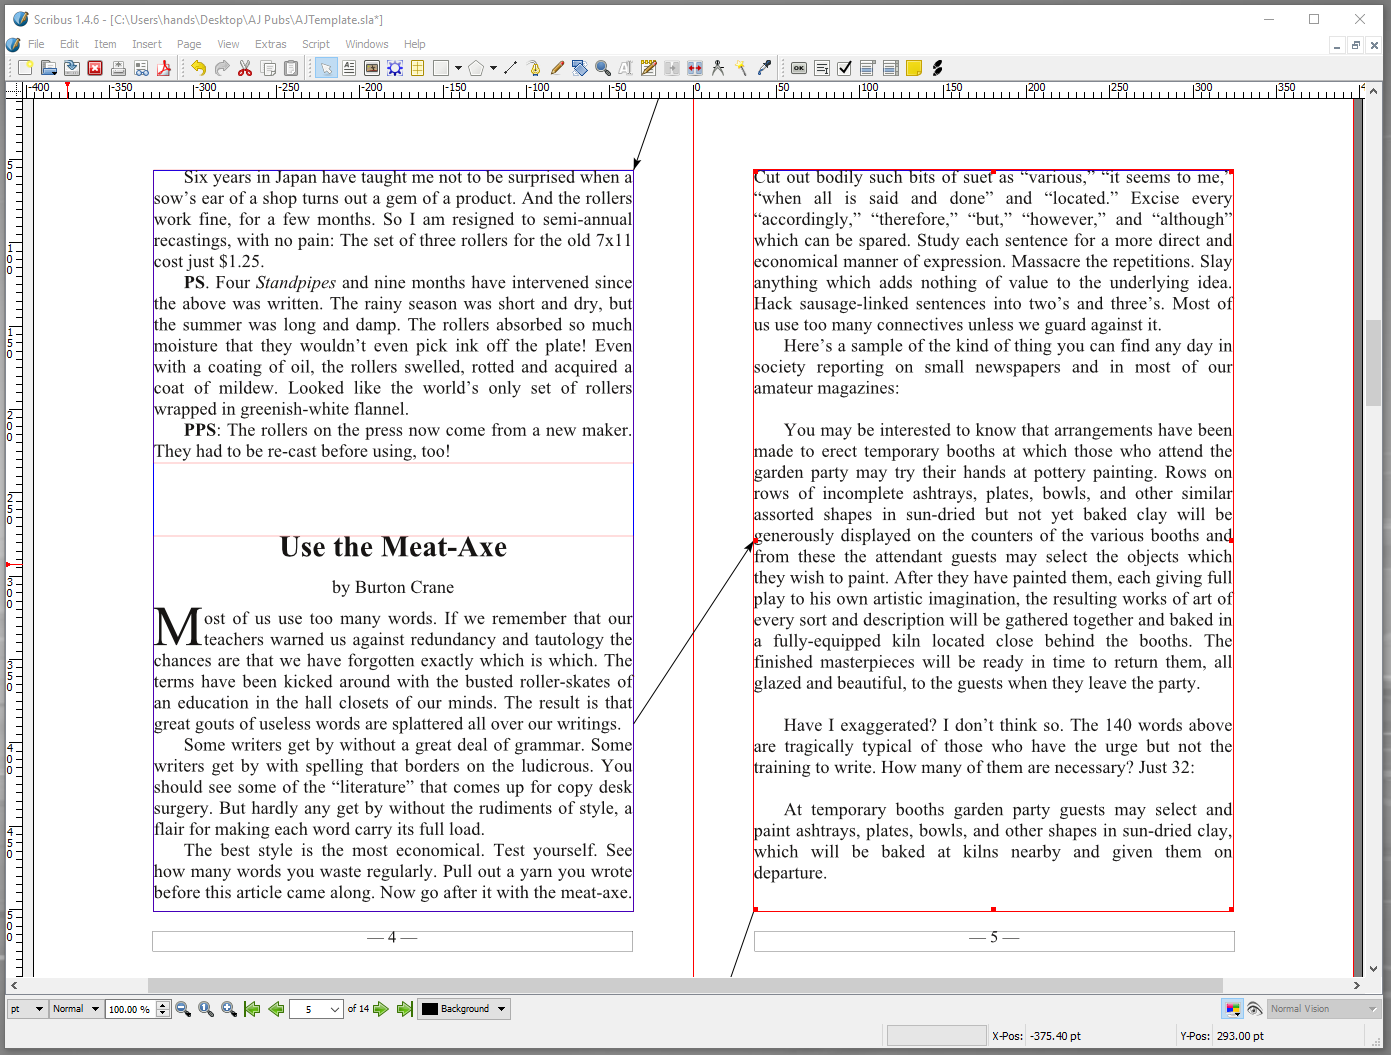
Pages 4 and 5 should now look something like this:
Save your work by typing ctrl+S.
Exercise 7: Adding Decorations and Fine-Tuning
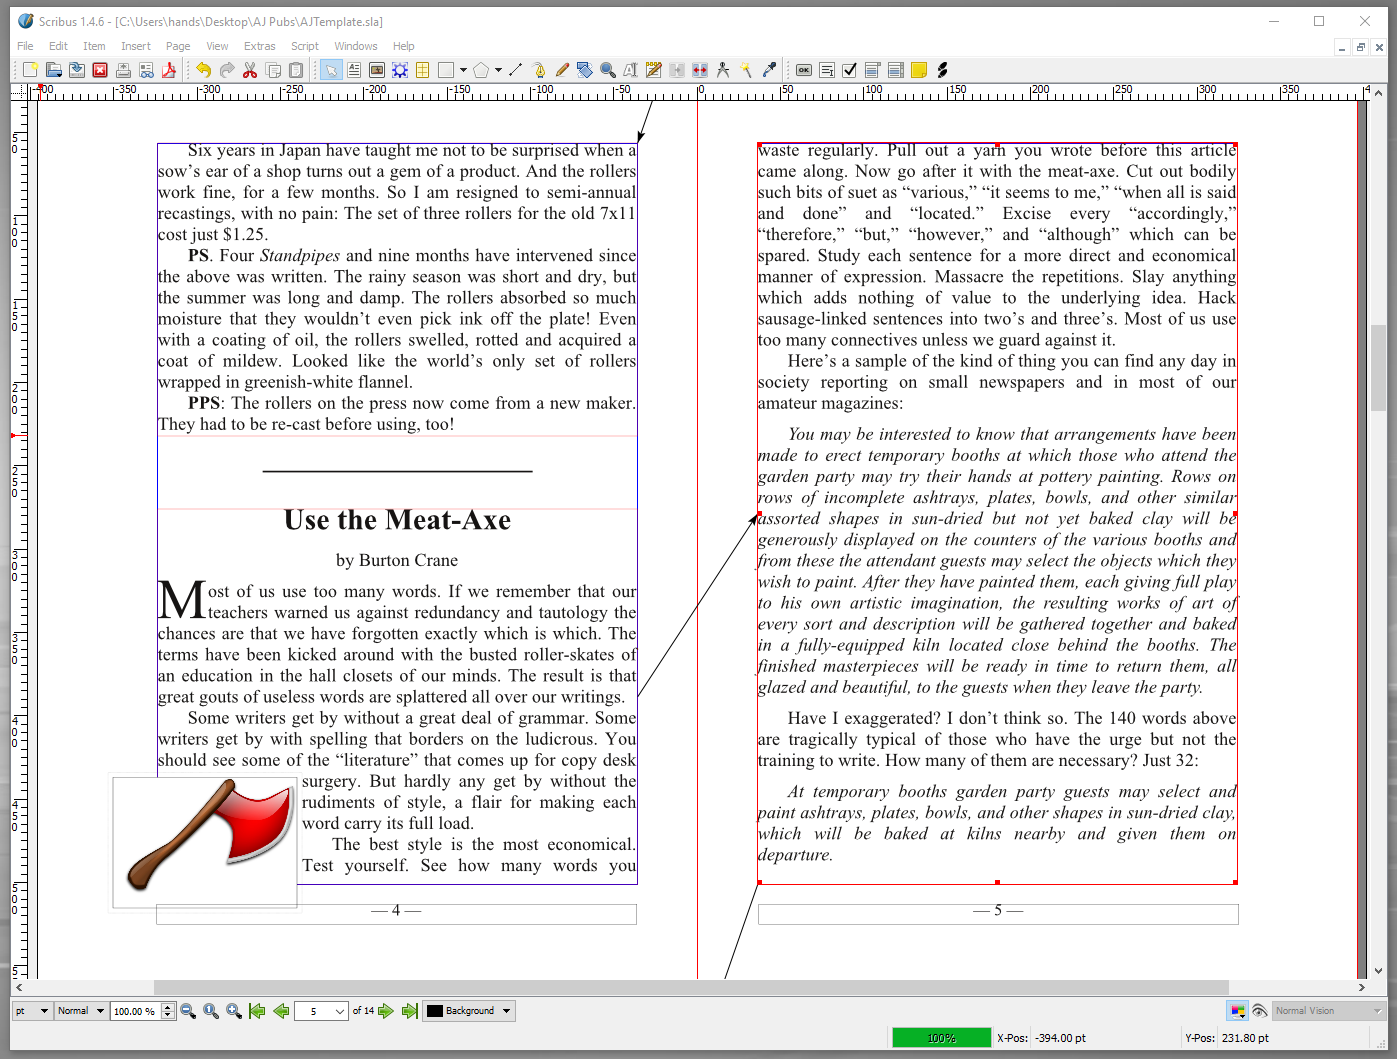
In this exercise you will add a horizontal line between the two articles, add an illustration to the second article, adjust inter-paragraph spacing in the "Use the Meat-Axe" article, and restore some italic formatting that was lost during the import.
7.1: Add a Line Between Articles
Select a horizontal line designed for an even-numbered page by going to page 14. Click on one of the lines found there and type ctrl+C to copy it. Return to page 4, then type ctrl+V to paste it. It will be a little high, so use the down-arrow key to move it where you want it.
7.2: Add an Illustration
As you did on the title page, you will add an illustration by first creating an image frame.
Select Insert > Insert Image Frame, then draw a box in the lower left part of page 4 that is on top of some of the text and also extends into the left and lower margins. (Creating this frame is similar to the way you created the one on page 1). We will load an image of an axe into the frame by
- typing ctrl+I,
- selecting the file Axe.jpg, and
- pressing the OK button.
To make the axe fit inside your frame, right-click inside the image frame and select Adjust Image to Frame from the pop-up menu. Move and resize the image frame until the axe is a good size and well positioned.
Notice the image covers some of the text so it cannot be read. To get the text to flow around the image (instead of under it), you will need to change the image's properties. To open the Properties window, either
- type F2 or
- right-click in the image frame and select the bottom item in the pop-up menu, Properties.
In the Properties window, click on the Shape button, and then select the Use Contour Line option. You should notice the text move around the image as soon as you make the selection.
The image is still too close to the text. Expand the Contour Line around the image. Choose the Edit... button at the top of the Shape section in the Properties window, and a new Nodes window will open. Select the Edit Contour Line checkbox.
Here's what the Properties and Nodes windows look like:
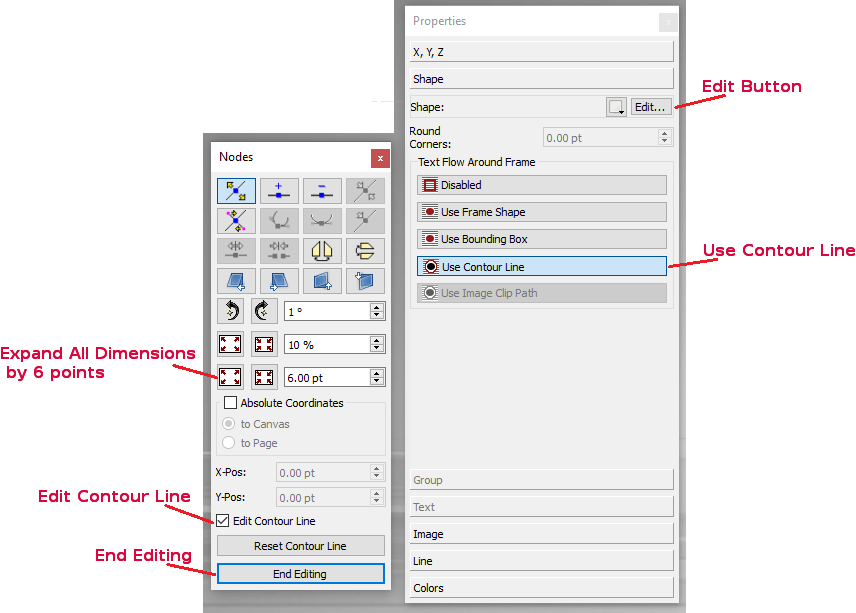
Expand the contour line by 6 points (1/12 of an inch) on all sides by entering 6.00 pt in the lowest of the 3 fields, and then clicking one time in the button to the far left of it that has a rectangle with arrows pointing outward to the corners. (If you prefer, you could set the field to 1.00 pt and click on it six times, allowing you to see how it looks at each step.) That should allow enough room for a comfortable space around the image. (Notice that the blue box around the image expands when you click the control.) Press the End Editing button at the bottom of the Nodes dialog when you are done.
Back in the main window, you may wish to use the left-, right-, up-, and down-arrow keys, or your cursor, to fine tune the location of the image.
Here's what pages 4 and 5 look like after inserting the line and illustration:
Save your work by typing ctrl+S.
7.3: Adjust Inter-Paragraph Spacing and Add Italics
In the article, Burton Crane provides examples of writing. These are set off from the main text by blank lines -- but the separation lines don't need to be full-height lines (about 12 points). You will change them to 6 points. Also, in the original document the example paragraphs were set in italics, but Scribus imported them as Roman. You will italicize them.
Select any of the frames in the chain holding the article (from the bottom of page 4 through page 12) by clicking in it so its frame turns red, then open the Story Editor window with ctrl+T.
Inside the Story Editor window is the full text of the article in the right-hand column, with each paragraph's style indicated in the left-hand column. The seventh paragraph is one of the blank lines. Click on its style name in the left column (MiddleParagraph), then select Leading6Points from the pop-up menu. Even though the blank line looks the same in the Story Editor, it will shrink in the main window after the changes are saved.
The paragraph following the blank line ("You may be interested to know...") is example text that should be italicized. Drag your mouse over the text in the paragraph so that all the characters are selected. Notice the font indicator near the top-left of the Story Editor window says Times New Roman Regular. Click on this pull-down menu and select Times New Roman Italic. Again, the Story Editor text does not look any different but the main window text will become italic after the changes are saved.
Change the blank line following the paragraph to Leading6Points style in the same way you changed the previous separator line.
After you successfully change a paragraph and its separators, it's a good idea to update the text frame via ctrl+U and then verify that it looks correct before going on to the next change. If you have made a mistake and catch it before updating the text, you can close the Story Editor without saving, throw away the mistake, and then reopen the Story Editor. If a mistake makes it into the text, roll it back with a ctrl+Z.
Make similar changes (6 point leading above, italicized text, 6 pint leading below) for the other five paragraphs that are set off by blank lines. Close the Story Editor window when you are done.
Here are pages 4 and 5 after changing the height of the blank lines and italicizing example text:
Save your work by typing ctrl+S.
Exercise 8: Creating Text With LibreOffice
Scribus is a publishing program, not a word processor. It has a limited capability to enter text, so you need a different way to type your articles. Scribus knows how to import OpenDocument Text (.odt) files, and LibreOffice knows how to create them. You can use LibreOffice Writer to create an article, save as in an .odt file, then import it into Scribus.
To help you get started, the AJ Pubs folder has a blank .odt file, AJTemplate.odt, that includes custom paragraph styles useful for amateur journals. The styles are nearly identical to the styles used in Scribus. When you want to create a new article, copy this template file to a new name, then create the article in the new file. The page dimensions used by this template closely match those used by the Scribus template. Because they use similar dimensions and styles, you get a good idea of how much space will be used for the final format in Scribus while typing in LibreOffice Writer.
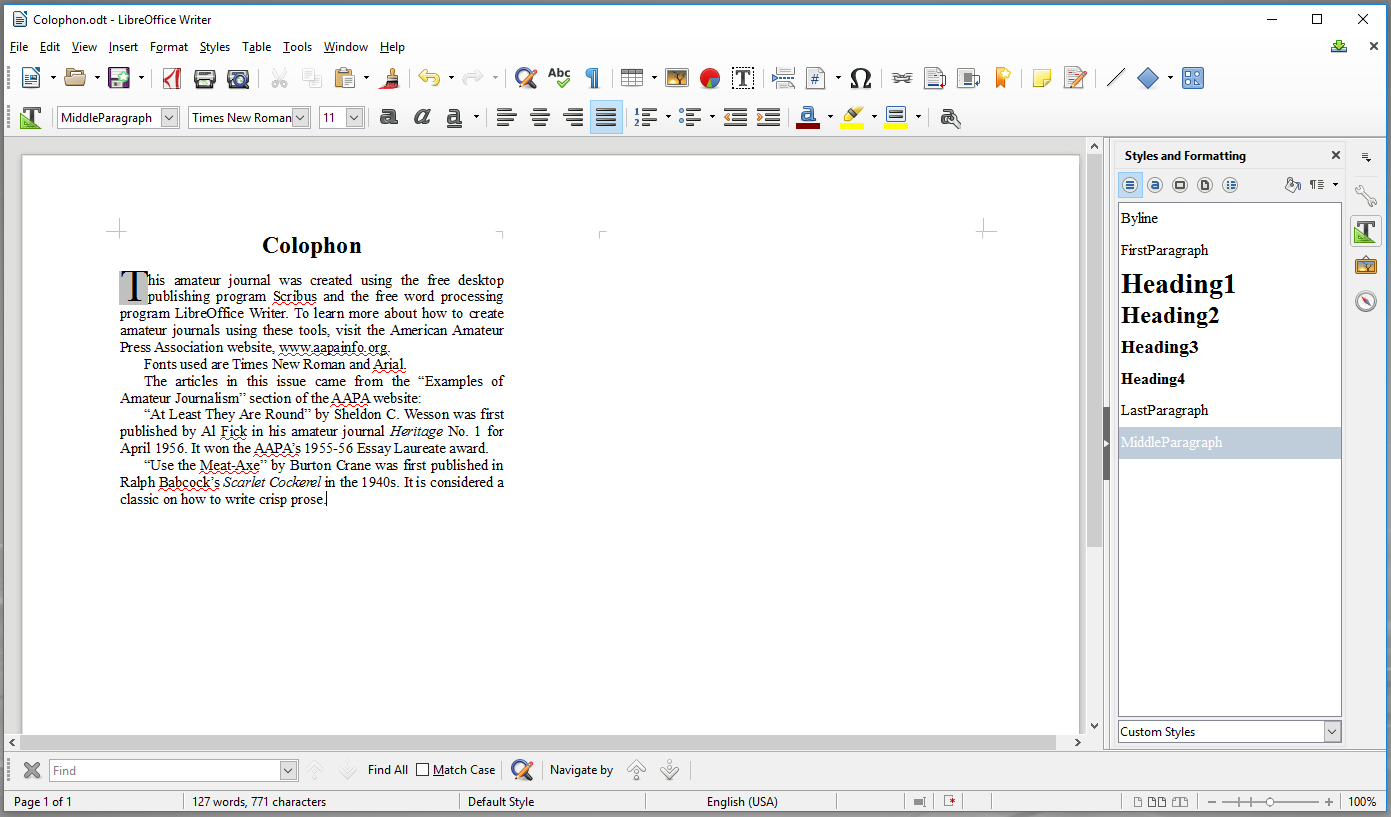
For this exercise, you will write an article to fill the blank space at the bottom of page 8. It will be a colophon for the journal, describing the production process. Make a copy of the AJTemplate.odt file named Colophon.odt, and then double click on this new file to open it with LibreOffice Writer.
LibreOffice Writer comes with many paragraph styles. In order to facilitate the creation of amateur journals, eight custom styles have been added with names that match the styles defined in the Scribus template file. To see the list, either
- type F11 or
- select Styles > Styles and Formatting
Ensure that the menu at the bottom of the Styles and Formatting column is set to Custom Styles.
Start creating the colophon by selecting the Heading2 paragraph style and then typing "Colophon" and enter.
For the second paragraph, select FirstParagraph style. When you finish typing the contents of this paragraph and press enter, the style for the next paragraph should automatically change to MiddleParagraph
Since the spacing of the text in the Scribus and LibreOffice Writer template files is quite similar, you can judge how much space you are filling. Keep typing until it looks like the space available on page 8 will be filled.
Notice that LibreOffice Writer offers word processing options that the Scribus Story Editor lacks, such as:
- Automatic warning of spelling errors (red underline)
- Automatic "curly" quotes
- Automatic translation of "--" to em-dash
- Turn on/off bold formatting with ctrl+B
- Turn on/off italic formatting with ctrl+I
- Turn on/off underlining formatting with ctrl+U
Here's an example colophon that you could use:
Save your work by typing ctrl+S. You can close LibreOffice Writer and return to Scribus.
Exercise 9: Completing The Journal
Our example journal is nearly complete. In this exercise you execute several tasks to put the finishing touches on it.
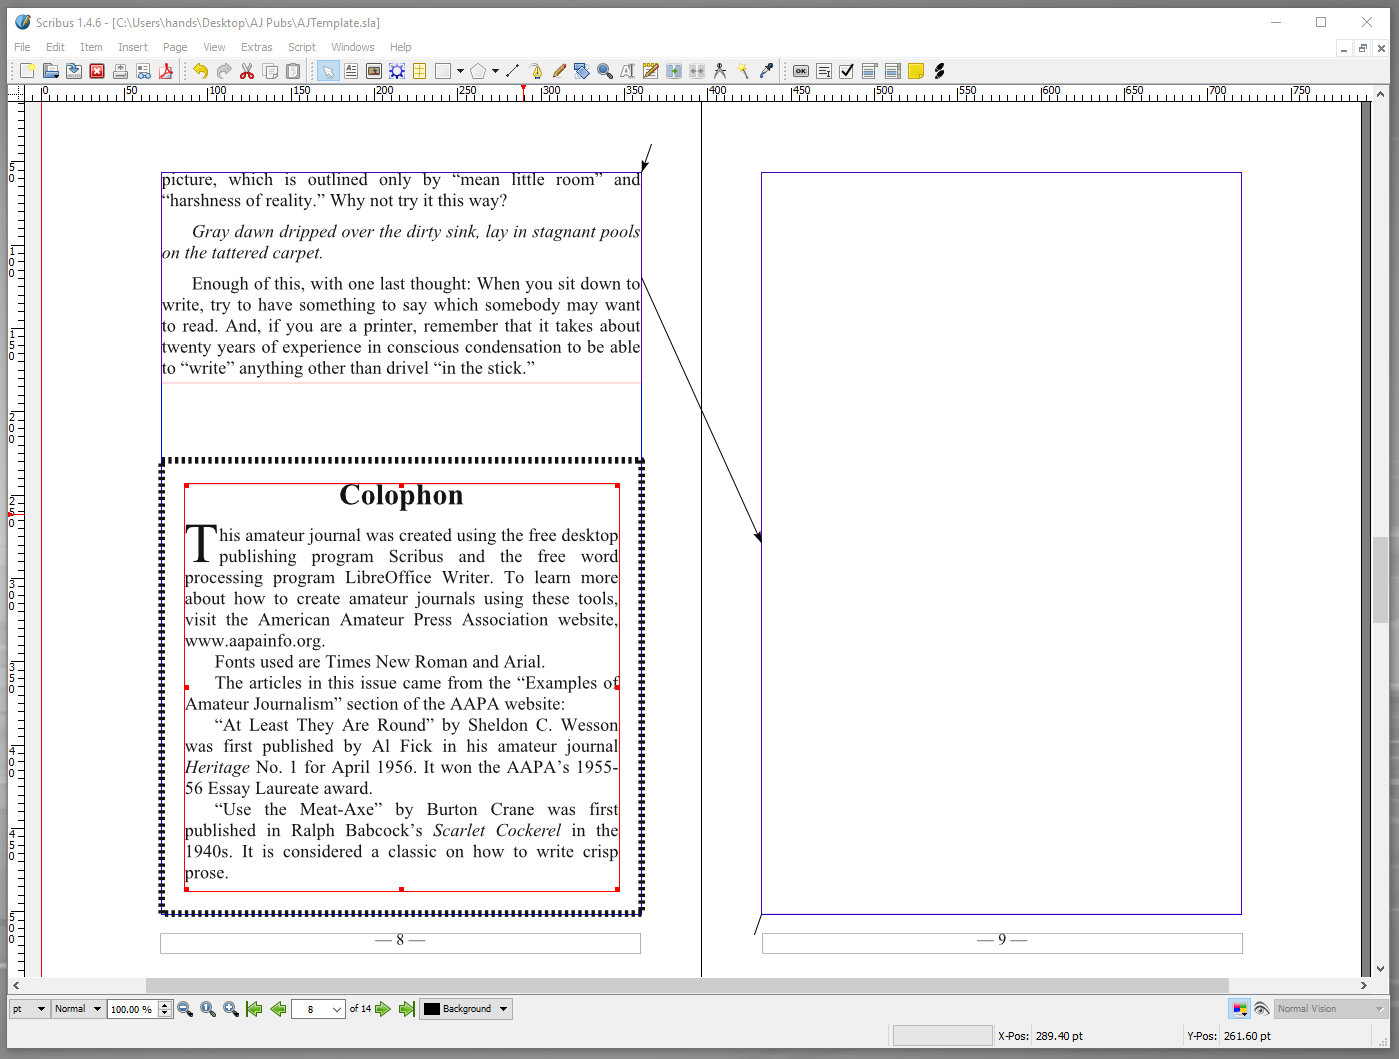
9.1: Shorten the Page 8 Text Frame
The Meat-Axe article uses only part of page 8. As you did with the Round article that ended on page 4 (in Exercise 5), shorten the text frame on page 8: select it (making its outline red), then drag the handle in the center of the bottom line up until it is close to the last line of text.
9.2: Creating a Box
How about putting a box around the colophon? You can do that in much the same way as you added a horizontal line in Exercise 7.
Go to page 14 (since you want a box formatted for an even-numbered page). Click on the box found there (its outline should turn red to indicate you have selected it) and type ctrl+C to copy it. Return to page 8, then type ctrl+V to paste it. It will be shorter than you want, so grab the handle in the middle-top and move it where you want it (about 1/2 inch below the end of the Meat-Axe article).
If you want to modify the properties of the box (say, make the outline thicker or turn it into a solid line), you can open its Properties window by typing F2 and clicking on the Line button. Modify the Type of Line or the Line Width controls until you are happy with the results, then close the Properties window by clicking the X in the upper-right corner.
9.3: Adding the Colophon Text
Because you want the colophon text to be inside the box, you will create a text frame positioned there. Choose Insert > Insert Text Frame, then use your cursor to draw the frame inside the box.
Adding the colophon text to the frame is similar to Exercises 4 and 6: Type ctrl+I to open the file selection dialog window, select Colophon.odt, and click the OK button.
Open the Style Manager window with F3 and then delete/replace the new paragraph styles that begin with Colophon_, as you did in Exercises 4 and 6.
You can adjust the size of the text frame by dragging its handles until the text appears to have similar margins with respect to all four sides of the box. To ensure the text frame is centered within the box,
- Select Windows > Align and Distribute; the Align and Distribute dialog window will open.
- Select the box by clicking on it in the main window. While holding down shift, click on the Colophon text frame. Both items should be highlighted.
- In the dialog window, on the Align tab, set the Relative to control to First Selected in the pull-down menu (since you selected the box first).
- The Align Sides By: control should be set to Moving (Preserve Size) by default.
- Click the top-middle icon; hovering over it shows the title Center on vertical axis.
- Click the bottom-middle icon; hovering over it shows the title Center on horizontal axis.
- You can close the dialog window by clicking the X in the upper-right corner.
Page 8 should now look something like this:
Save your work by typing ctrl+S.
9.4: Removing Extra Pages
Because there are four pages on each double-sided physical sheet of paper, the journal will contain a multiple of four pages (4, 8, 12, 16, etc.). You've filled up 8 pages and have used up the available copy, so it must be time to quit! Delete pages 9 through 14 by selecting Page > Delete..., then in the Delete Pages dialog window enter From: 9 and To: 14. Press the OK button to complete the deletion.
9.5: Optional: Hyphenation
Unsightly large gaps between some words in the text can likely be removed through the use of hyphenation. Unfortunately, adding hyphenation can change paragraph formatting enough so that you must resize text frames or move other elements.
Automatic hyphenation is turned off. Use Extras > Hyphenate Text to turn it on for the selected text chain. (In this example journal, it would be turned on separately for each of the two articles, plus the colophon.) Be careful! There are a number of words in the default dictionary that are mis-hyphenated, so you will need to carefully review the text to ensure correctness. If you find an error in hyphenation, you can correct it via File > Document Setup > Hyphenator for the current document and File > Preferences > Hyphenation and Spelling for new documents. Open the appropriate dialog window and in the Exceptions column type the mis-hyphenated word with correct hyphenation (e.g., "jour-nal-ism").
You could choose to insert hyphens manually rather than use the automated system. If you use the hyphen key on the keyboard, future edits of the text or even minor reformatting could change how words cross line boundaries, and you’ll have to go back and find the hyphens that moved to the middle of lines. Instead you can insert a "soft hyphen" that is used only when needed. Position your cursor at the appropriate place in the text and use either
- Insert > Character > Soft Hyphen or
- ctrl+shift+-
to insert a hyphen that will appear only when needed at the end of a line.
9.6: Corrections
Make a pass through the entire document looking for any errors -- misspellings, bad hyphenation, wrong fonts, etc.
If you discover the text needs a small change, you won’t want to go all the way back to the ODT file to make the correction; you would then need to clear the text from the text frame and reload the text into Scribus. Instead, you can select the text frame containing the error and use the Story Editor (ctrl+T), as was described for changing inter-paragraph spacing and italicization in Exercise 7. Minor textual errors (such as inserting/deleting characters) can be made from the main Scribus window without opening the Story Editor.
When editing text, some characters cannot be entered from the keyboard. If you want a "curly" quote (single or double, left or right), dash (em or en), copyright symbol, et al, use Insert > Character > (where the Insert pull-down menu is inside the Story Editor window if you are using it, or in the main window if not).
Once you are satisfied, save your work by typing ctrl+S.
Exercise 10: Preparing a PDF File
If you aren't printing all the copies of your journal on your own printer, you will export the document to a PDF file and then deliver that file to whoever is doing your printing. Start the process with File > Export > Save as PDF....
The seven tabs available in the Save as PDF window provide numerous options, but the defaults should work well. Do examine the Output to File: field at the top to ensure the PDF file will be saved in the expected directory. When you click the Save button in the lower right part of the window, a small window pops up briefly, showing progress on the conversion. When it’s done, the PDF file has been created.
To perform a test printing to your own printer, leave Scribus and open the PDF file with Adobe Acrobat Reader. Within Acrobat, use ctrl+P to open the Print window. On the Page Sizing & Handling option, select Booklet. The output diagram should display 2 pages per sheet, and you should see the first and last pages together on the first sheet. Make sure the correct printer is selected at the top of the page, and use the Properties button to ensure the correct options have been set (such as double-sided printing). Push the Print button near the bottom right corner to send the PDF file to your printing device.
Check with whoever is doing your printing to find out if they have preferences for how your PDF file is formatted. They may want the booklet format within the PDF file, or they may prefer single pages. If you are using exotic fonts, you may need to embed them within the file. (See the Fonts tab on the Save as PDF window.) The first time you work with a printing firm, you might find it useful to ask for a single sample printout and check it over before doing the full run.
CONGRATULATIONS!
You have made it far enough into the tutorial to create an amateur journal. The remaining exercises provide a bit more information on topics you might run across as you work on your own.
Exercise 11: Exploring Properties
Each Scribus item (text frame, image frame, line, shape, etc.) has properties associated with it. You should understand the basics of properties because from time to time you may need to change them. Open an item's Properties window by selecting it and then typing F2. If you select a different item, the window's display will change to show the new item's properties.
Check the properties of the text frame on page 1 by selecting it and typing F2. There are several groups of properties displayed. You explored the Shape properties in Exercise 7 and the Line properties in Exercise 9. The default is to show X, Y, Z (the location of the item). The X- and Y-positions show the distance from the upper left corner of the page, expressed in the units chosen by the lower-left control in the main window. As noted earlier, the default for AJTemplate.sla is to use points. If you change the unit of measure, the Properties window will immediately update.
Here's what the X, Y, Z controls in the Properties window look like:
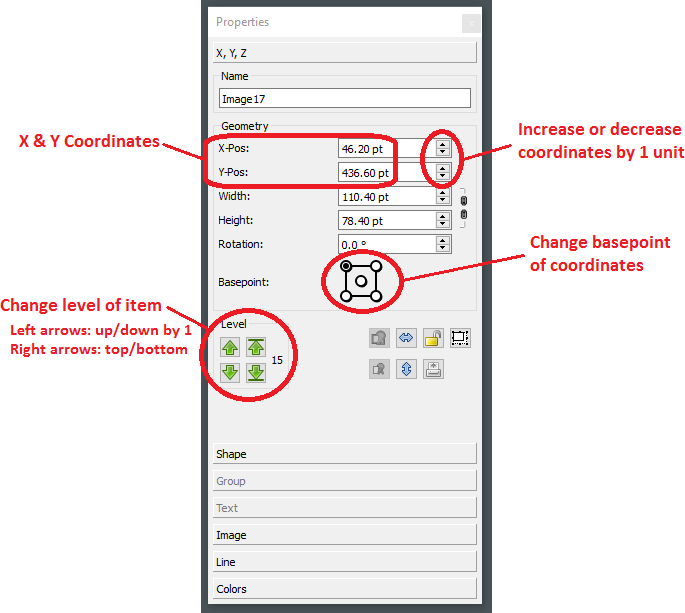
The location information also includes the width and height as expressed in the measurement units, and the rotation expressed in degrees. The up and down arrows on the far right of each of these controls allow you to adjust the value up or down by one unit, or the rotation by 1 degree. As you change the position values, the item will move in the main window.
The Basepoint for the X- & Y-coordinates can be upper-left (default), upper-right, center, lower-left, and lower-right. For example, if you click the Basepoint center dot you will see the X-Pos and Y-Pos change to coordinates at the center of the frame.
Below the Basepoint control is Level. Each item in the document has a unique level value, making it higher or lower than the others. Clicking on the up- and down- arrows in the left column change the level by 1. Clicking on the up- or down-arrow in the right column moves the item to the top or bottom level.
When you add an illustration that overlaps a text column, you will probably want the illustration on top – that is, the illustration's frame will have a larger level number than the text frame.
Try an experiment to see how this works. Go to page 4 and click on the axe picture. The Properties window changes to show the characteristics of the image frame. Click on the little up-arrow on the far right of X-Pos; this should add one point, moving the illustration to the right. Using the X- and Y-Pos arrows you can fine-tune the placement of the illustration.
Because you added the image frame after the text frame, it has a higher level. (You can select the text frame to verify this.) With the axe selected, click on the right green downward arrow (in the Level group) to put the image frame at level 1. The text will then overwrite the image. You can restore the image's prominence by clicking on the right green upward arrow and move it to the top.
Exercise 12: Changing Fonts
You will probably want to choose fonts different from the defaults (Times New Roman and Arial) used in the Scribus and OpenDocument template files provided with this tutorial.
Scribus does not generate italic or bold fonts "on the fly," as many word processing programs do. If you want a bold style in the font you are using, you must have it on your system as a separate font file. The same is true for italic and bold-italic. (Having bold and italic isn't important for a display face used for the title, dateline, or headings, but can be vital for the text font you use to set articles.)
12.1: Finding Fonts on Your System
You need to determine what fonts are available on your own computer. Here's a page that describes How to find fonts on Windows 10.
I pressed Windows Key+E to get the pop-up window, then entered shell:fonts for the location; the window switched to ThisPC > Windows (C:) > Windows > Fonts and displayed a series of icons with font names below them. Some of the icons indicated multiple styles.
When I selected the Book Antiqua icon, the bottom of the window showed these styles were available: Regular, Bold, Bold Italic, and Italic. This font looks like a good option.
When I selected the icon for Baskerville Old Face, it only had Regular for a Font Style. It can't do the job.
Fonts on my computer that had all four styles available include Bodoni MT, Bookman Old Style, Calibri, Calisto MT, Cambria, Candara, Century Schoolbook, Constantia, Corbel, Georgia, Gill Sans, Liberation Sans, Liberation Serif, Lucida Bright, Lucida Sans, Open Sans, Palatino Linotype, Perpetua, PT Serif, Trebuchet, and Verdana.
Fonts that don't have Bold Italic but do have the others are still serviceable. On my computer these include Bell MT, Californian, Garamond, and Goudy Old Style.
Scroll through the fonts on your own system and see which ones look good, then determine if they have the required alternate styles.
Sometimes LibreOffice and Scribus don't agree on font names. For example, importing an .odt file that uses Bookman Old Style confused Scribus and it complained. I had to tell it to make the following substitutions while reading the file:
- Change Bold an Old Style to Bookman Old Style Bold
- Change Bookman Old Style to Bookman Old Style Regular
- Change Italic Book an Old Style to Bookman Old Style Italic
Once you tell Scribus to make the substitutions, it remembers them for future files.
12.2: Changing LibreOffice Writer Fonts
Let's say you determined that Georgia was more to your liking than Times New Roman, and you want to make it your default body type. You might recall that many different paragraph styles (Byline, FirstParagraph, Heading1, etc.) in both LibreOffice Writer and Scribus use the font. These styles were created so that you only need to change the font name in one definition to update the entire document.
To see how to make the change, open Round.odt in LibreOffice Writer and right-click in a paragraph that uses the MiddleParagraph style. Select Edit Style... from the pop-up menu.
In the dialog window that opens (Paragraph Style: MiddleParagraph), select the Organizer tab. The Inherit from: field is set to Text Body. Click the Edit Style button on the far right of this control.
A second dialog window (Paragraph Style: Text Body) will open; select its Organizer tab. The Inherit from: field is set to Default Style. Click the Edit Style button on the far right of this control.
A third dialog window (Paragraph Style: Default Style) will open; select its Organizer tab. The Inherit from: field is set to - None -, so you must have gone as deep into the hierarchy as possible. Click on the Font tab. Scroll the list of fonts (or type in the box at the top of the list) and select Georgia. Click on the Apply button (third from left at bottom) to make the change. The text in the main LibreOffice Writer window will immediately change from Times New Roman to Georgia. If you wanted to use a different size of type, you can change from 11 pt. When you are satisfied with your choices, click the OK button in all three dialog windows to close them. You could delete all the text (ctrl+A followed by delete key) and save the file as AJTemplate-Georgia.odt as a starting point for a future journal.
12.3: Changing Scribus Styles Fonts
There are fewer steps to change the default font in Scribus. Open AJTemplate.sla with Scribus and then type F3. In the Style Manager window, select Default Character Style (near the bottom, under Character Styles), then click on the Edit >> button. In the Basic Formatting section, change the Family control from Times New Roman to Georgia. When you click on the Apply button (second from right at bottom), the header and body text in the main window will change to the new font.
If you wish to change the size, the control is just a little further down in the dialog window.
If you want to use a different font for the title and dateline, click on the Flag and Date character style and change its family from Arial.
Because you have modified this file extensively while doing these exercises, you might not want to save it as a template for future work. Instead, you could change the font(s) in the copy of the original template that you saved at the beginning of the tutorial, and then save that under a new name (e.g. AJTemplate-Georgia.sla) as a starting point for a future journal.
Exercise 13: Adding Headers
Add a header to all pages after the first, a header that includes the title of your journal, the date of publication, and the issue number. To do this, you will modify the left and right master pages -- the places holding information shown on multiple printed pages.
Use Edit > Master Pages... to display the master pages in the main Scribus window. A small window (Edit Master Pages) lists the three master pages defined in the template and allows you to select which one to modify.
The top selection, First Page is plain: it only has margin guides set for a right-hand page. That's all that's needed for the title page.
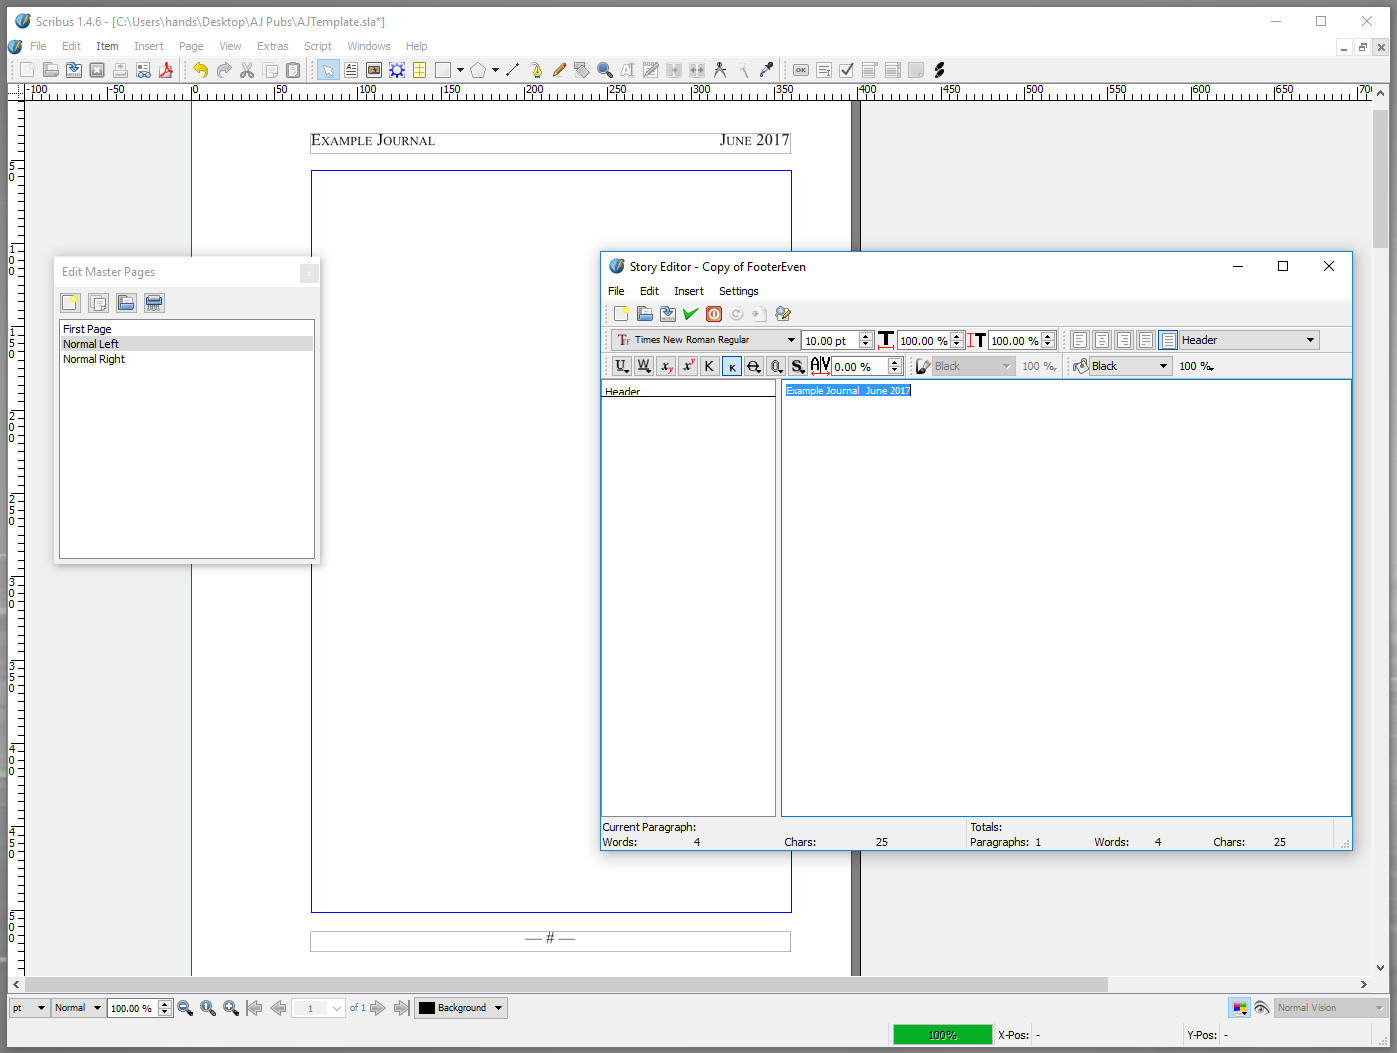
Normal Left switches the guides for a left-handed page, but also has a text frame at the bottom, with just enough room for one line of text. Select that frame and type ctrl+T to examine its contents. You can see there are two em-dashes around the special red "#" character, which represents the current page number. The paragraph style is Footer, which centers the line and sets it in 10 point Times New Roman. After completing your examination, you can close the Story Editor window.
You want a header the same size and horizontal position as the footer, but positioned above the main page guide. With the footer frame still highlighted, type ctrl+C to copy it and ctrl+V to paste a copy. It's hard to see the copy because it is exactly on top of the original, but by using the up-arrow key you can move the copy towards the top of the page. Hold the key down until the header is in a good position.
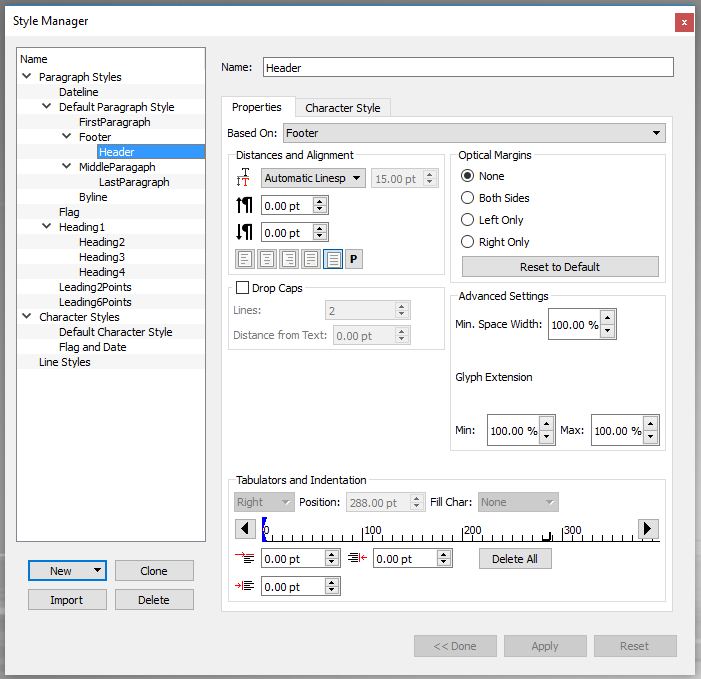
Next, define a new paragraph style that will allow you to put the journal name on the left margin and the date on the right margin. Open the Style Manager by typing F3, then click on New > Paragraph Style. Set the following fields found in the Properties tab
- Name = Header
- Based On = Footer
Base this style on Footer so it uses the same font size. If you later change the size in Footer, it will automatically change Header too. It also picks up a characteristic found in the Tabulators and Indentation section: a Right Tab positioned at the right margin (288 points). One Footer characteristic to change is alignment: from centered to right justified. You find this control at the bottom of the Distance and Alignment group of controls, where the second rectangle is currently selected. Select the far-right (fifth) rectangle instead. Press the Apply button (near bottom-right of Style Manager window) to create the new paragraph style.
Here's the definition of the Header paragraph style:
Next, you will use the new paragraph style in the text frame you created on the Normal Left master page. Select the upper text frame and type ctrl+T to edit the text. In the left column, change paragraph style from Footer to Header. In the right column enter the new text (replacing the page number left over from the footer): "Example Journal"tab"June2017"; pressing ctrl+U updates the display of Normal Left master page in the main screen. Set the text in small caps rather than lower case by selecting all the text in the Story Editor window via ctrl+A, then selecting the 6th box (with small K) in the controls immediately above the paragraph styles column.
Here's what the Normal Left master page looks like:
While the new header paragraph is selected, type ctrl+C to copy it, then in the Edit Master Pages window select Normal Right and type ctrl+V. The new header doesn't align with the right page guides. Invoke Windows > Align and Distribute to align the frame Relative to Margins, and then click on the "center on vertical axis" button in the middle of the first row, as you did in Exercise 3.
Change the text inside the frame to "Number 1"Tab"Example Journal", and make sure it uses small cap formatting.
When you are done editing the master pages, close the Edit Master Pages window by clicking the X in the upper right corner.
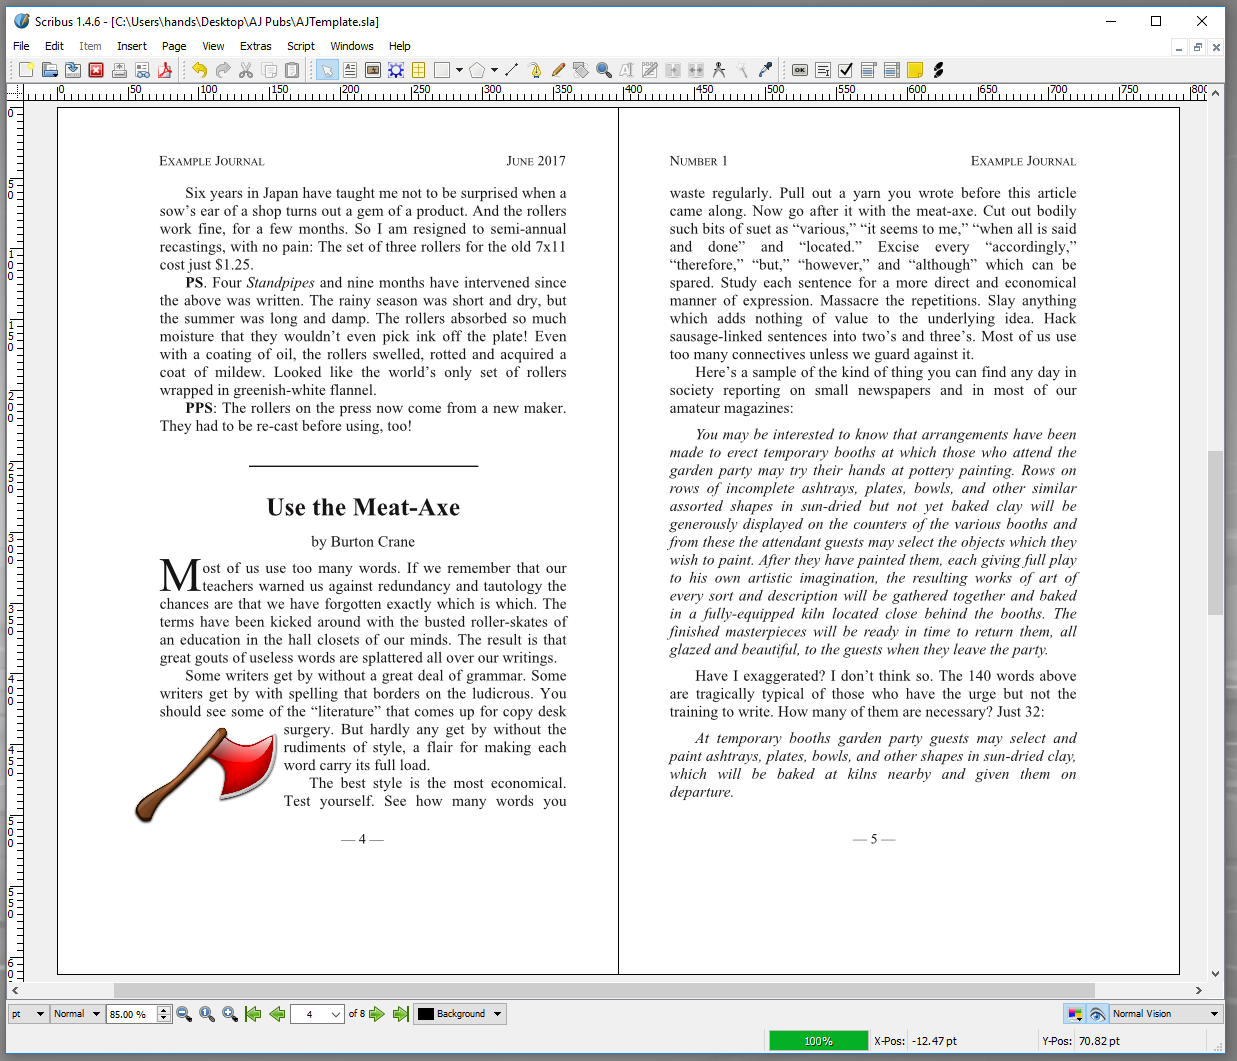
Having the guides, frames, text chain, etc. displayed in the main Scribus window is useful for putting your pages together, but sometimes you want to remove the clutter and simply see the printable items. You could change all of your selections in the View menu, but it is easier to set View > Preview Mode, then reset it when you want to go back to your previous settings. Here's what pages 4 and 5 look like with the new headers, shown in preview mode and reduced to 85% so the entire page height fits in the main screen:
If you want to keep the new headers, save your work by typing ctrl+S. (Otherwise you can reload the previous version of AJTemplate.sla via File > Revert to Saved.)
Exercise 14: Setting Templates
In these exercises you have been making changes to the template file, but you were careful to keep a pristine copy as a starting point for future work.
A better way to keep the template unchanged is to tell Scribus and LibreOffice Writer to save your pristine templates in their own template areas. Then when you start a new document you can easily base it on your templates.
14.1: Scribus Templates
Let's suppose you have modified the original AJTemplate.sla to use the fonts you like, and have saved it as AJGaramond.sla. Double-click on that file to open it in Scribus. To set it as a template, use either
- File > Save as Template... or
- ctrl+alt+S
The Choose a Directory dialog opens to allow you to select a directory that will hold your personal templates. If the default directory looks good, click the OK button.
When I tried this the first time, Scribus reported an error creating a directory; but the second time it had no complaints. Scribus opened a Save as Template dialog that allowed an opportunity to change the name or add details about the template. Click the OK button when you are ready to save. You can then exit Scribus.
Then next time you run Scribus without specifying a file name, it will present a New Document dialog. Click on the New from Template tab and select the Own Templates option in the left-hand column. The middle column should then include an icon for AJGaramond. After you select it, the file will open and appear in the main window. When you save the file, Scribus will ask for a new name.
Making changes to the template file in your Documents directory does not change the version stored as a template. To update that version, use Save as Template... again.
14.2: LibreOffice Writer Templates
LibreOffice Writer has a similar capability of saving templates, accessed via File > Templates > Save as Template...
Frequently Asked Questions
If you have questions about this tutorial, send them to me. If they are of general interest, I may add them to this section.
Q. I'm interested in learning more. How do I access documentation about Scribus?
A. The Scribus manual is available via either
- F1 or
- Help > Scribus Manual...
Q. When I print two-sided, the second page is upside-down from the first page. Is there some setting on the print options I should change?
A. Each printer seems to have its quirks. In the Print dialog, click on the Properties... button. This should bring up another dialog that is specific to your printer. My printer has a Finishing tab, and on that page I set the options...
- Print On Both Sides selected
- Orientation set to Landscape
- Flip pages up is not selected.
If your printer has the wrong combination of Orientation and Flip (or whatever terminology your printer uses), the pages will not align properly. You may need to experiment with various combinations. Be sure to record what works for you so you have it the next time you try to print.
Q. When I loaded an .odt file that uses Bookman Old Style, Scribus was confused about the imported font name and asked me to give it the correct one. I accidentally clicked on Arial, and now it substitutes Arial whenever I want Bookman. How do I correct this?
A. To fix a bad font substitution, click on File > Preferences..., which will open up the Preferences window. In this window,
- Select Fonts In the column of icons on the left-hand side of the window, (7th from top)
- Select the middle tab Font Substitutions
- You should see two columns, with the incorrect name on the left and the replacement name on the right. Click on the Replacement that says Arial; it should turn into a pull-down menu. Select Bookman Old Style Bold.
Q. After deleting several pages in the middle of my journal, the page numbers at the bottom are no longer centered below the text columns. What happened?
A. Apparently a side effect of the way you deleted pages was to mix up a left and/or right master page. I usually don't delete pages in the middle, but instead clear out the contents of text frames and adjust their chaining. If you have the problem of a column set up for a right page ending up on a left page, you could always insert a page before the one that is out of whack. Next you will have to create a text column on the new page. You can copy a correctly-positioned (right vs. left) column and paste it onto the new page.
Q. I'd like to change the text size in one paragraph in the Story Editor window. I highlight the text, then try to make the change, but most of the time it does not take. Is there a trick?
A. When selecting text in the Story Editor, it’s easy for the Editor to de-select it. Be sure the wanted text is highlighted, immediately make the change (new size, font, etc.), and then update the main window (ctrl-U). If you don’t get it right the first time, you will need to re-select the text and give it a try once again.
Q. The tutorial mentions that LibreOffice Writer offers word processing options that the Scribus Story Editor lacks, one of them being "curly" quotes. Does that mean that once it is in the SLA document, curly quotes cannot be added?
A. You can insert “curly” quotes either within the Story Editor or from the main Scribus window. From the main window, position your cursor in the text where you want to insert and then use
Insert > Quote >
Don’t select apostrophe from the pull-down menu, because that is the non-curly single quote. Instead, select single right. In the Story Editor the procedure is the same, except you use the Insert menu that’s found inside the Story Editor window. You can see there are all sorts of characters you can insert in this way – copyright, bullet, em-dash, en-dash, and even ligatures (although I’ve not found a font where using the ligatures makes a difference).
Resources
- Tutorial: A.J. Publishing Using Scribus
- Desktop Publishing of Hobby Journals
- Graphic Arts on the Web
- Letterpress: ATF and BB&S Catalog Information
- Letterpress: Golding Printing Presses
- Letterpress: Hobby and Professional Shops
- Letterpress: Local Printing Groups
- Letterpress: Printing Museums
- Letterpress: Typefaces Available from U.S. Foundries
- Other Amateur Journalism and Printing Groups
- Reciprocal Links
- Resources for Letterpress Printers
- Writers' Resources on the World Wide Web
JOIN AAPA!
Become A Member!
 Amateur journalism is a unique activity. Amateur journalists publish journals on paper & online & come from many perspectives: from deluxe letterpress printed journals, to Xeroxed newsletters, to artistically designed cards and ephemera. We embrace the spirit of being amateurs – loving what we do for pure joy and not financial gain – while creating top quality journals, zines, and homemade publications.
Members receive ...
- The monthly bundle mailed via the postal service
- Access to the website and e-journals
- e-mailed updates
- Ability to publish your stories on AAPA

 |
|